Baker Documentation
Surface
Baking, sometimes call skinning, is the transformation of an object
procedural texture, lighting or surface definition into a traditional
texture map. Baker adds these possibilities to Carrara.
To
bake an object shader, select first the
object in the scene, then choose the menu item Edit->Baking or press
Ctrl+F. Note that several objects
can be selected at the same time: Baker will generate as many maps as
there're selected objects.

3
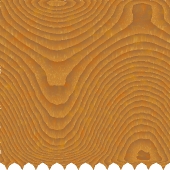
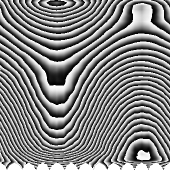
map types can be exported. The first one, the
Texture Map, transforms one of the shader channel into a texture map.
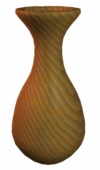
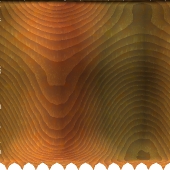
Look for example at this vase model. It's shader is a
3D solid texture, both in the diffuse channel and in the
bump channel. To transform this channel shaders into texture map,
first be sure that the UV mapping of the object is a coherent one.
Baker uses the UV map to transform 3D shaders into 2D texture maps, so
if the UV mapping has flaws, like overlap ping
triangles, these will
be visible into the baked map. Then in the Baking dialog, select the
Diffuse and the Bump channels. The
background color is used for unassigned pixels (the UV mapping might
not cover all the UV space). If the object has several shading, 3
options are available: you can choose to export
all the domains into 1 map (Merge Shading Domains), to
create a different map for every shading domain (Separate Shading
Domains), or to export only 1 of the domains by selecting it in
the popup menu. ping
triangles, these will
be visible into the baked map. Then in the Baking dialog, select the
Diffuse and the Bump channels. The
background color is used for unassigned pixels (the UV mapping might
not cover all the UV space). If the object has several shading, 3
options are available: you can choose to export
all the domains into 1 map (Merge Shading Domains), to
create a different map for every shading domain (Separate Shading
Domains), or to export only 1 of the domains by selecting it in
the popup menu.
|


 normal maps. The first one
(include in Deeper)
uses the information countained in the
normal maps. The first one
(include in Deeper)
uses the information countained in the